Browsed by
Category: other things I make

a project for the mama: February "Lady" Sweater

a project for the mama: February "Lady" Sweater

After knitting for my babies, husband, siblings and friends, I finally took time to make something just for me: the adult version of Elizabeth Zimmerman’s February Sweater.

I used just over 3 balls of Caron’s Country merino blend in “foliage” and am so happy with how it knitted up! The merino has a silky sort of drape to it, and, while warm, is light enough to be perfect in an air conditioned building this summer.

I also really love the a-line swing shape that it has. It eases nicely over my belly (due date tomorrow!) and will still be cute come this fall and winter when I am getting my normal figure back. :)
I really love it!!!

my preferred crafting spot

my preferred crafting spot


close-up of a project for Baby#2

I am comfortable on the floor. Especially when I’m doing paper crafting. Scrapbooking …… I use a table for that, but only because you really need a firm surface to work on. If we had wood floors I’d probably do that on the floor too!
I like the floor because:

  • I can see everything.
  • There’s enough space to have it all spread out around me, 
  • and I can reach it.

On the table I tend to lose things, or stack them up or put them in a box so that I can have more room and then I forget where I put them.

Some people have entire rooms devoted to crafting (Martha Stewart comes to mind …). I think if I had one – even with counter tops and so on – I’d still end up on the floor. It just works really well for me.

Until naptime is over, that is. :)


homemade Moses basket

homemade Moses basket


After about a week of working on it, off and on, I finished Baby’s basket last night.

I’ve been wanting to have a Moses basket for our babies, but just haven’t been wanted it badly enough to fork over $70 (or more, depending on sales and the company I was looking at).

So, when I was walking through Walmart one day and saw this basket for $5 in their home decorating section, I decided to try to make/line my own. How hard could it be, right?

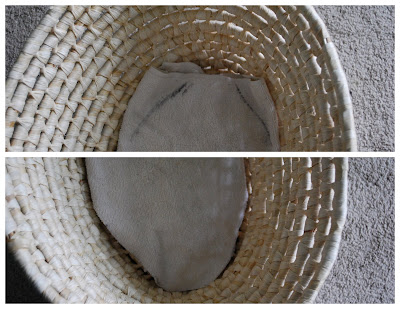
The first step (other than drawing up a pattern, which I figured I’d skip), was to figure out how to pad the bottom. I didn’t have any batting on hand (and didn’t want to spend any more money) so I folded one of the “rag” towels into thirds and laid it in the bottom. I traced the outline of the edge with a Sharpie and cut.

I sewed through the center of what was then a stack of three pieces of terry cloth to keep them from shifting.
Then I took some dark brown quilting weight material and made a sort of pocket that I slipped stack of toweling into. Sewed the end, quilted it, and the little mattress (of sorts) was done.


The first half was done, now to make the bumper!

-the layers of the bumper: inside, padding, outside-

I used material that I had in the closet for the bumper – more dark brown quilting weight and also some aqua and white seersucker from a blouse that had belonged to my Gramma.

This is the part that I really should have made a pattern for. If anyone reading this is thinking of making one, I’d really recommend doing a trial run with paper!
The bumper I made turned out really cute, just about 4″ too small! Also, I tried to sew the entire thing together and forgot that I need to turn it right side out! So, more stitch ripping but both mistakes were easy to fix.

For the inside I did a colorblock pattern with the brown on the ends and the seersucker in the middle. I used the rest of the towel for the padding, and the last bit of the seersucker for the outside.

I really love how it turned out, but next time I will make a pattern and plan how I’m going to turn it right-side out!

mobile for our little Ian/Kate

mobile for our little Ian/Kate

Before Emma was born I made a mobile to hang over her crib using a quilting hoop, some birds made from scrapbook paper and some thread. Well, this little one is getting closer and closer to arriving, and yesterday I realized that he (or she) was still lacking a personalized sleeping space.
I still had the other half of the quilting hoop in my craft stuff, so I used it to make another mobile.
I am really suspecting that this baby is a boy, but since we haven’t had an ultrasound I’m not absolutely positive (either way, we’re excited!). I decided to use brown and blue colored paper for the mobile, thinking that if Baby turns out to be a “she” instead of a “he” it wouldn’t be so masculine that I would need to remake it.
I used:
  • a quilting hoop
  • scrapbook paper
  • a circle punch
  • brown satin ribbon
  • glue
  • silk thread (I like using silk thread for projects like this because I find it is so much easier to tie knots with)

Since I had used the inside of the hoop for Emma’s mobile, the half that was left had the clasp sticking off the side. I really wanted to get it done yesterday without running out to the store, so I just bent the clasp pieces over, put a bit of glue between them, and wrapped the ribbon over it all. It worked pretty well!

Fold circles in half (I used 4 circles for each pendant),
add some glue and stick the pieces together.

I wanted the pendants to hang at an angle so that Baby will have a more interesting view when he’s staring up at them, so I poked the hole for the thread slightly off to one side of the center spine.

I made 7 pendants: I hung 6 of them around the rim of the hoop and the 7th I hung from the center of two threads that crossed the hoop at right angles.
Then I hung the whole thing from the ceiling. I really love how it turned out. :)

middle of the night inspiration

middle of the night inspiration

The idea for these little votive hangers came to me a few nights ago, during one of my (increasingly frequent) middle-of-the-night episodes of wakefulness. I think my average per night is up to three times now, and occasionally four. Just getting ready for those late night sessions with Little One!

I made something similar using mini jelly jars a while ago, but that night I had the idea to use some of the many glass votives that I have stashed here and there. (I suppose one could have too many votive holders, but I haven’t gotten there yet. Or maybe I’m not the type of person that can have too many?)

I used some 18 gauge aluminum wire in about 18″ lengths, and twisted it to make a ring that would hold the votive.

Then I took the loose end and wrapped it under the base, looped it around the ring and made a hanger. Twist the final loose end in place, and …

… that’s it!


Favorite%2BThings%2BFridaybig%2Bbutton.jpg

Mother’s Day Silhoutte

Mother’s Day Silhoutte


I saw this idea a while ago over on Prudent Baby and tucked it away in the back of my head to use for Mother’s Day.
The ladies over on Prudent Baby used the idea to make artwork from pics of Zoo animals, but I thought it might be a fun and different way to do the silhouette of Emma that I am trying to give to my mom each Mother’s Day. It turned out to be pretty easy (and fun! I haven’t messed around with water colors in a while!).
The hardest part was getting a clear profile photo of Emma. She was sooooooo busy that morning. :) I finally just turned on the TV and sat next to her with the camera, waiting for her to stop “telling” me about everything she saw and just “zone”.
Also, I didn’t have any watercolor paper on hand so I just used some heavyweight textured scrapbooking paper. It worked fine, but I think watercolor paper might have been just a little nicer. I’m sure Mom – Grammie – will love it anyway!
If you’d like one yourself, I have a listing for custom silhouettes over on Etsy.


I was about to toss out the scrap that I had used for the template and then decided to tape it up instead. Pretty cute! And I get to keep and enjoy it, too. :)


a DIY skirt for a bed with side rails

a DIY skirt for a bed with side rails

Here’s a project that I just finished {a DIY skirt for a bed with side rails}. It’s not shop related, but I thought you might like to see anyway. :) And, just because you might like to see how I did it, it’s a kind of tutorial, too!

This is our bed. So comfy, with some gorgeous bedding, too. But, since I had never gotten around to altering the bed skirt to fit the bed frame, all the stuff that we are storing under it (we live in an apartment with limited storage space) was visible to anyone who walked by the doorway. That was something I decided to finally fix!I already had the bedskirt that came with our bedding, and it was the typical bed-in-a-bag kind that is supposed to lie between your mattress and boxspring. Since we have a solid bottom bed we don’t have a boxspring, and the side rails of the bed are in the way and would get covered if I was going to just spread the skirt before putting the mattress down.

So … I cut the side panels off of the skirt.
That took a little bit of courage since it is from the Martha Stewart Trousseau line at Macy’s. If I messed up it wouldn’t be cheap to replace!
I took a pack of 2″ wide sew-on Velcro and cut it into 1″ wide strips, lots and lots of them.

I pinned the female sides about 8″ apart on the outside (the side that would be showing) of the bedskirt panels, and sewed them in place using my machine.

I then took my husband’s staple gun and crawled under the bed to staple the male sides of the Velcro to the inside of the side rails and panel at the foot of the bed, 8″ apart again.
John walked into the room as I was doing this and laughed – it must have been a pretty funny sight to see me, 8 months pregnant, with my head and arms under the bed and my belly and feet sticking out!

The last step was to stick it all in place!

Ta da!

The Girl Creative


flower pin tutorial

flower pin tutorial

Here it is! The thing I was working on – other than compulsively organizing our apartment in preparation for Baby #2 – is this little flower pin tutorial. Enjoy! :)
(by the way, this is a great way to use up random scraps of fabric that you might otherwise toss as you are spring cleaning your stash)

start by sewing – with a doubled thread to prevent breakage – through the end of the strip to anchor your thread and gather the end. this will be the center of your flower.

materials:
fabric – a strip (at least an inch wide) cut from a 45″ piece of material, selvage to selvage
scissors
needle and thread
pin back
fabric glue

Cut a piece of fabric at least an inch wide (your flower will be twice as wide as your strip). I used a quilting weight fabric that was 45″ wide for this flower, but you can use any type in any length. The length that you use will determine how “full” your flower is.

continue to sew a running stitch along one side of the strip, pulling the thread to gather it every few inches.

once you have sewn and gathered about 12″ or so, begin to coil the strip into a flower, sewing it in place as you go
…continuing to gather, coil and stitch until you come to the end of the strip.
It should look a little like this.
Sew the pin back on and knot off the thread. Almost done!

Glue a snippet of fabric over the bar of the pin (this part allows you to hide any messy stitches).

Ta da! That’s it. Rather simple and quick, unless you are interrupted, that is ……… some of these flowers have taken me more than a day to complete. :) And, if you want the one I made for the tutorial, you can buy it here in my Etsy shop.


in progress

in progress

I’ll show what it is in a little bit. :)
For now it is in progress in between enjoying the Spring weather, keeping up with Emma and doing a bit of Spring cleaning. Oh, and trying to get Emma’s baby album put together before Baby #2 shows up!

Posted by Picasa
little girl skirt

little girl skirt

Did you like the little skirt that I made for Emma a few days ago?

I used a free pattern download that I found over on the Oliver + S blog. Oliver + S is a darling company that designs and sells children’s clothing patterns. Their patterns are just adorable, and wonderful to work with!


This pattern is quick and simple to make (it doesn’t even have a rolled hem). In fact, it is so very quick and simple that I didn’t even take any pictures as I worked on it. Seriously, this projects goes by quickly. :)

I love that the material has a vintage look to it. :) And so wish that I could get wallpaper in that design!