in the quiet moments
I’ve been working on knitting Ian a sweater for the Fall. It’s the Classic Cardigan (I’m thinking that a cardigan will be easier to put on him than a pull-over style) from Essential Baby, and I’m using a cream colored cotton yarn that used to be a sweater of mine that was always a bit too short.
I’m knitting it up on silky smooth bamboo needles, and the combination of holding the soft cotton, bamboo and baby skin is so relaxing.
drumroll please ………
Our little one (he turned out to be not so little at 9lbs 7oz!) finally made his awaited appearance last Tuesday morning.
He is doing quite well, eating and sleeping and enjoying the Moses Basket. He also has a remarkably loud cry (our apologies to the neighbors).
Some of the things I love about him so far:
- the full head of hair (Emma was nearly bald until she was 6 months, so having an infant with hair is a new experience!)
- the dimple in the center of his chin (not sure yet what family member that came from)
- the gassy little half smiles
- his funny little ears
- the way he puts his hands over his head when he sleeps
and those are just some starters.
Our little family is getting to know the newest member, resting up from the interrupted nights and loving every minute of it. :) I had almost forgotten how wonderful newborn smells and sounds are ………
Celebrate Dad
The BBQ apron in my shop would make a great gift for Dad this year. I’m still looking for something for Emma and Baby#2 to give to John, though (we already have plenty of aprons on hands, since I make them :-).
Have any of you found something for your Dad, or your husband? I’m looking for ideas!
a little something about the shop
Just a friendly little reminder – almost all the stuff I have listed on Etsy is ready made and can be shipped out quickly. Just so you know. :)
a project for the mama: February "Lady" Sweater
After knitting for my babies, husband, siblings and friends, I finally took time to make something just for me: the adult version of Elizabeth Zimmerman’s February Sweater.
I used just over 3 balls of Caron’s Country merino blend in “foliage” and am so happy with how it knitted up! The merino has a silky sort of drape to it, and, while warm, is light enough to be perfect in an air conditioned building this summer.
I also really love the a-line swing shape that it has. It eases nicely over my belly (due date tomorrow!) and will still be cute come this fall and winter when I am getting my normal figure back. :)
I really love it!!!
my preferred crafting spot
I am comfortable on the floor. Especially when I’m doing paper crafting. Scrapbooking …… I use a table for that, but only because you really need a firm surface to work on. If we had wood floors I’d probably do that on the floor too!
I like the floor because:
- I can see everything.
- There’s enough space to have it all spread out around me,
- and I can reach it.
On the table I tend to lose things, or stack them up or put them in a box so that I can have more room and then I forget where I put them.
Some people have entire rooms devoted to crafting (Martha Stewart comes to mind …). I think if I had one – even with counter tops and so on – I’d still end up on the floor. It just works really well for me.
Until naptime is over, that is. :)
homemade Moses basket
After about a week of working on it, off and on, I finished Baby’s basket last night.
I’ve been wanting to have a Moses basket for our babies, but just haven’t been wanted it badly enough to fork over $70 (or more, depending on sales and the company I was looking at).
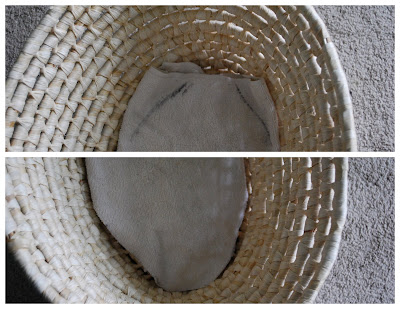
So, when I was walking through Walmart one day and saw this basket for $5 in their home decorating section, I decided to try to make/line my own. How hard could it be, right?
The first step (other than drawing up a pattern, which I figured I’d skip), was to figure out how to pad the bottom. I didn’t have any batting on hand (and didn’t want to spend any more money) so I folded one of the “rag” towels into thirds and laid it in the bottom. I traced the outline of the edge with a Sharpie and cut.
I sewed through the center of what was then a stack of three pieces of terry cloth to keep them from shifting.
Then I took some dark brown quilting weight material and made a sort of pocket that I slipped stack of toweling into. Sewed the end, quilted it, and the little mattress (of sorts) was done.
The first half was done, now to make the bumper!
I used material that I had in the closet for the bumper – more dark brown quilting weight and also some aqua and white seersucker from a blouse that had belonged to my Gramma.
This is the part that I really should have made a pattern for. If anyone reading this is thinking of making one, I’d really recommend doing a trial run with paper!
The bumper I made turned out really cute, just about 4″ too small! Also, I tried to sew the entire thing together and forgot that I need to turn it right side out! So, more stitch ripping but both mistakes were easy to fix.
For the inside I did a colorblock pattern with the brown on the ends and the seersucker in the middle. I used the rest of the towel for the padding, and the last bit of the seersucker for the outside.
I really love how it turned out, but next time I will make a pattern and plan how I’m going to turn it right-side out!
exciting!
Last Sunday Prudent Baby featured the watercolor silhouette that I made for Mother’s Day
Really, it’s so fun to click over to a site and see a photo of your project and a link to your blog. :D
Ladies, thanks for featuring me!
mobile for our little Ian/Kate
I am really suspecting that this baby is a boy, but since we haven’t had an ultrasound I’m not absolutely positive (either way, we’re excited!). I decided to use brown and blue colored paper for the mobile, thinking that if Baby turns out to be a “she” instead of a “he” it wouldn’t be so masculine that I would need to remake it.
- a quilting hoop
- scrapbook paper
- a circle punch
- brown satin ribbon
- glue
- silk thread (I like using silk thread for projects like this because I find it is so much easier to tie knots with)
Since I had used the inside of the hoop for Emma’s mobile, the half that was left had the clasp sticking off the side. I really wanted to get it done yesterday without running out to the store, so I just bent the clasp pieces over, put a bit of glue between them, and wrapped the ribbon over it all. It worked pretty well!
I wanted the pendants to hang at an angle so that Baby will have a more interesting view when he’s staring up at them, so I poked the hole for the thread slightly off to one side of the center spine.
I made 7 pendants: I hung 6 of them around the rim of the hoop and the 7th I hung from the center of two threads that crossed the hoop at right angles.
Then I hung the whole thing from the ceiling. I really love how it turned out. :)


