Browsed by
Tag: tutorial

how Tuesday – DIY shelf paper

how Tuesday – DIY shelf paper

Pretty DIY Shelf Liner{how Tuesday is back! Well, sort of :) I meant to post this on Tuesday, but better late than never!}

It’s that time of year – taking down and putting away all the loveliness of Christmas, cleaning, purging of clutter …. what better time than now to get your cupboards prettied up!

Brace yourselves:

DIY Shelf Paper via the Path Less Traveled

Well, let’s just say our pots and pans cupboard has looked worse. But it also has the potential to look so much better! Seeing a splash of pretty pattern and a tidy and organized stack of pans always soothes me just a bit, so one afternoon I decided to give the inside of our cabinets a little make-over.DIY Shelf Paper via the Path Less Traveled

materials needed: patterned paper {I used some giftwrap from World Market}

clear contact paper

ruler/yardstick/straight edge

pen or pencil

scissors

Step one: take everything out of your cabinet and wipe them out. You may need to use a bit of soap if they’re greasy – this is the perfect time to get all the little gross bits you’ve been ignoring since their hiding in the shadows taken care of!

DIY Shelf Paper via the Path Less TraveledStep two: measure the bottom of the cabinet. Once you have the dimensions, roll out your paper {wrong side up} and mark the size you will need.DIY Shelf Paper via the Path Less Traveled Step three: cut it out!DIY Shelf Paper via the Path Less Traveled Step four: unroll the contact paper, and cut off a section about an inch longer on each side than your pretty paper {so, if the base of your cabinet is 14″x20″, your contact paper needs to be 16″x22″}. DIY Shelf Paper via the Path Less Traveled step five: peel the backing off of the contact paper and carefully center the art paper in the middle. Notch the corners like this:DIY Shelf Paper via the Path Less Traveled and fold the edges over the back of the pretty paper, sealing the edges.DIY Shelf Paper via the Path Less Traveled This makes your pretty paper into a semi rigid shelf liner!DIY Shelf Paper via the Path Less Traveled 
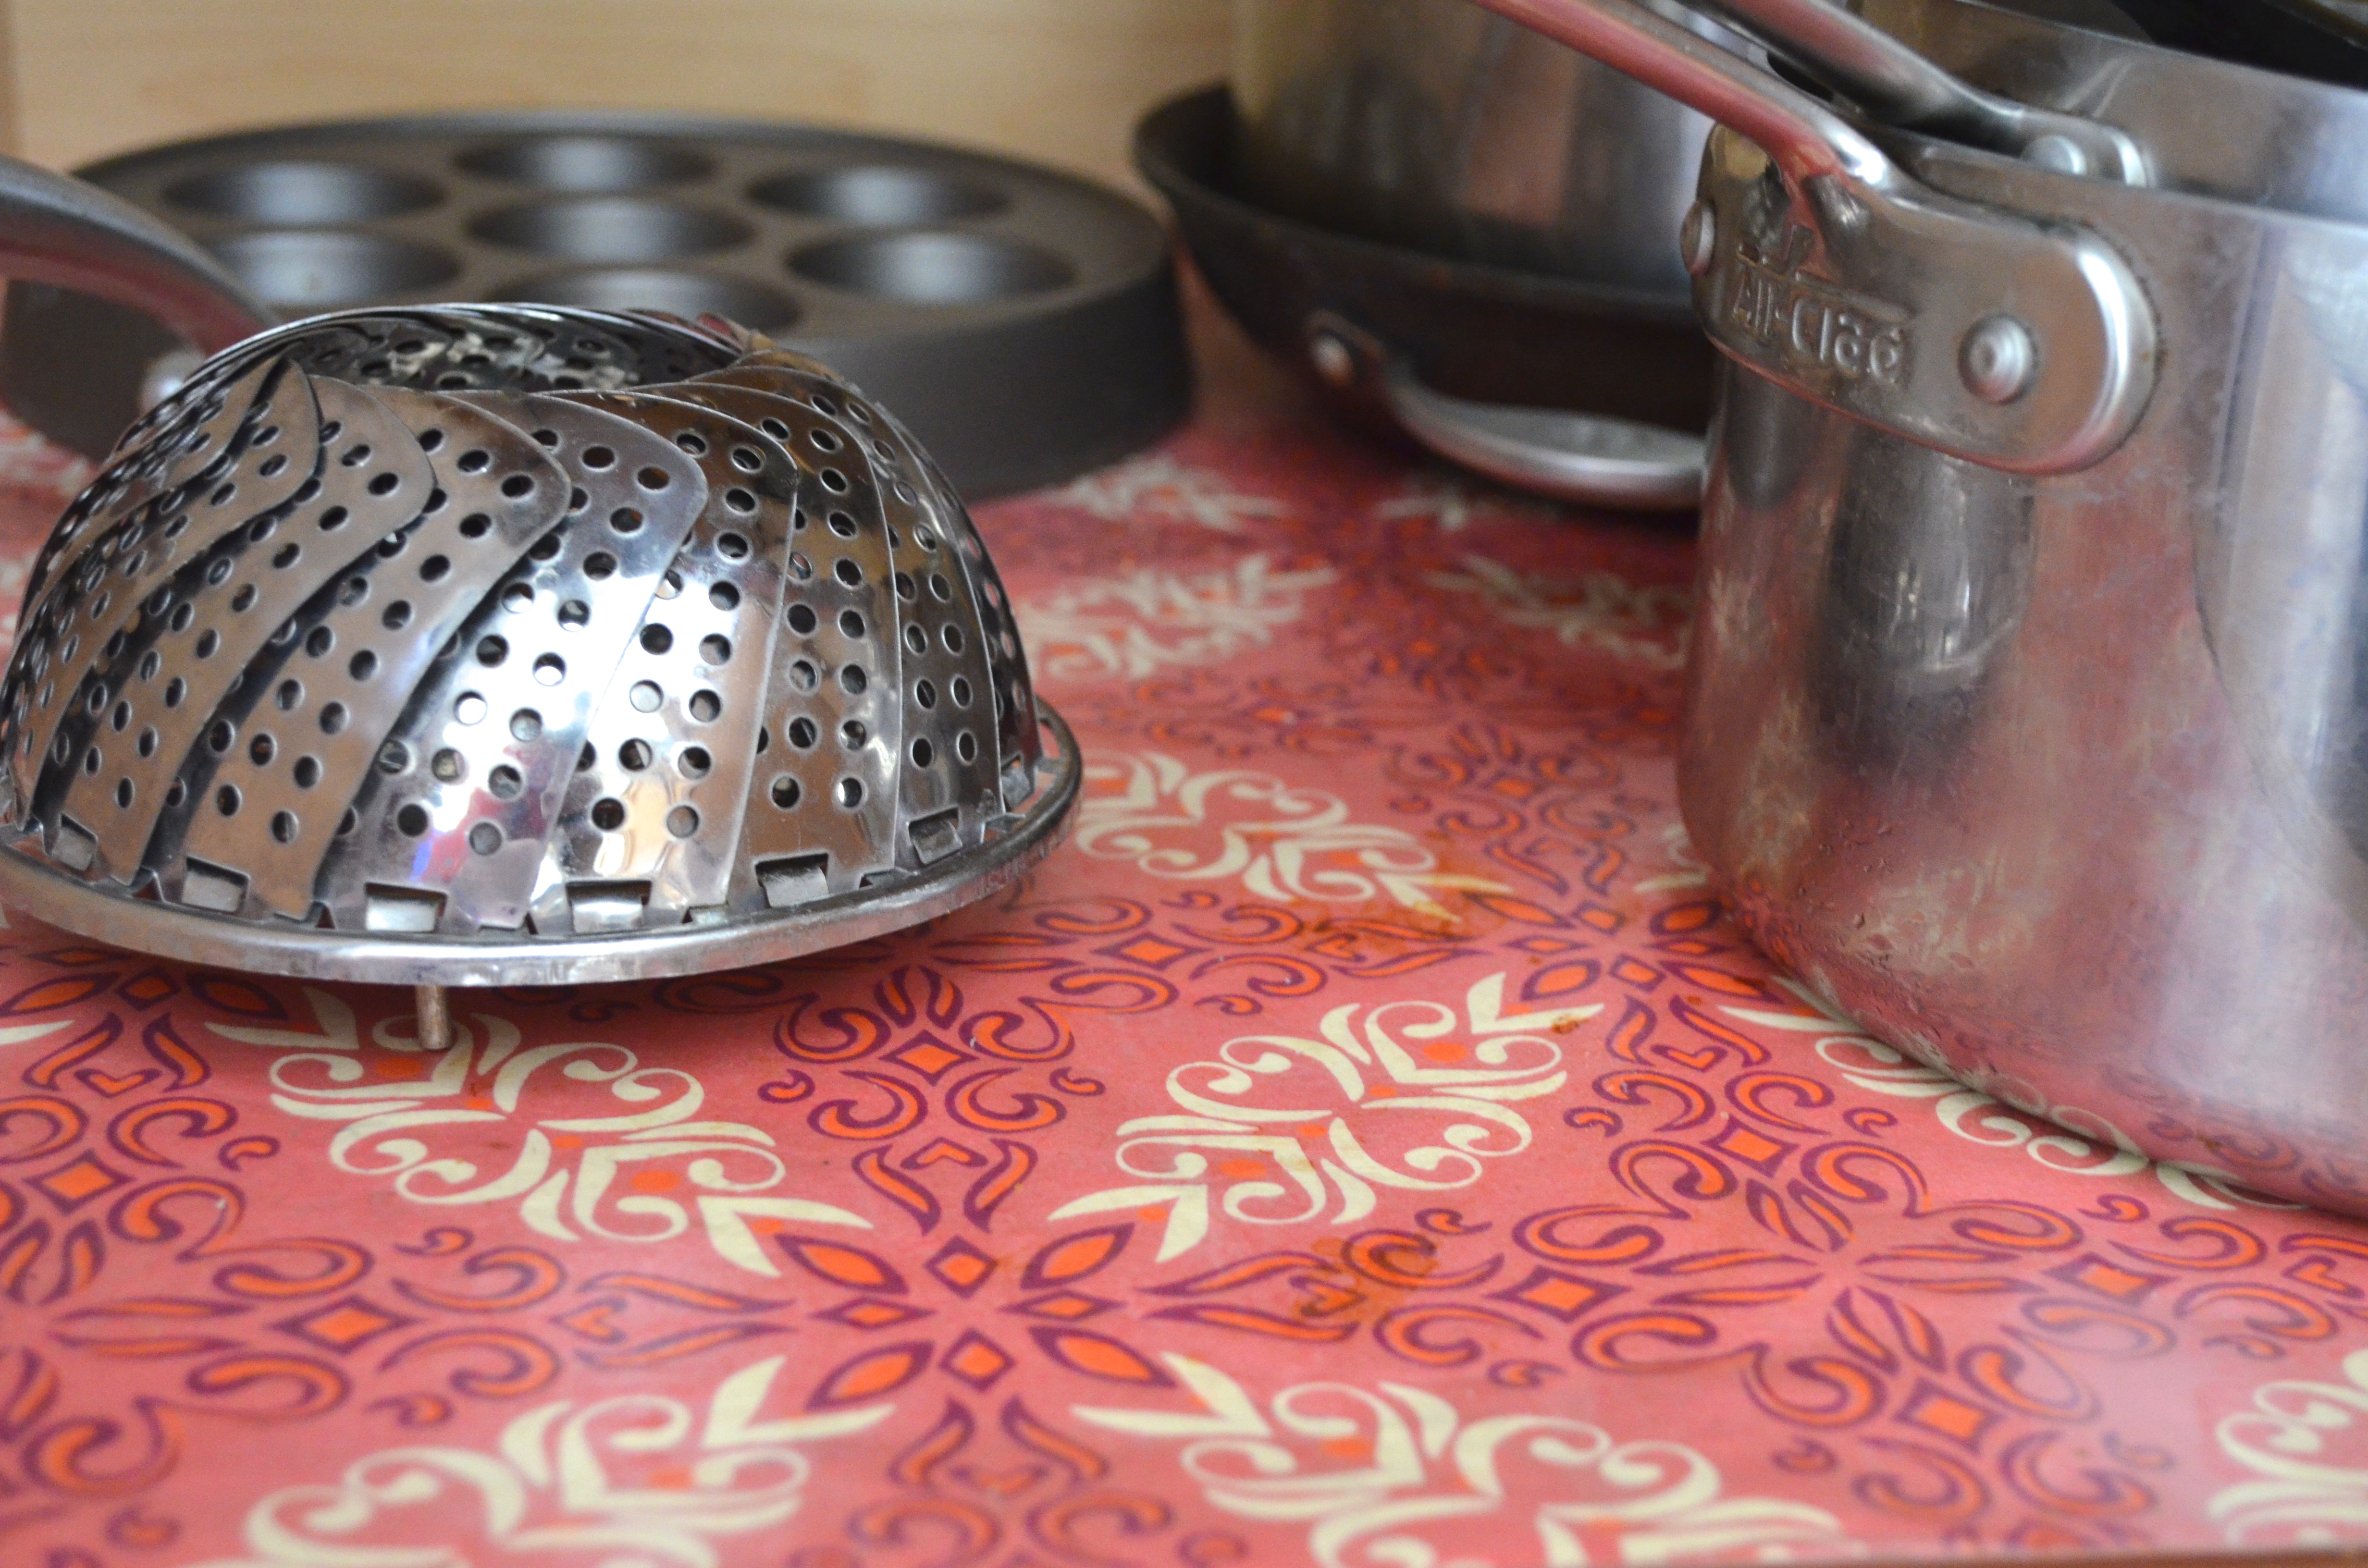
Step six: slip the new shelf liner into your cupboard and …DIY Shelf Paper via the Path Less Traveled have fun arranging and organizing your kitchen ware!
Organizing a cabinet on the Path Less TraveledPretty DIY Shelf LinerOne of the lovely things about this is that if your cabinet gets really gross {not that it would, but you know, if}, you can just take the liner out, carry it over the sink and wipe it of – so much easier than kneeling with your head in the cupboard as you scrub out the sticky spots!


<3


how Tuesday – growing your own green onions

how Tuesday – growing your own green onions

for today’s how Tuesday – we have a tutorial on growing your own green onions! Yay, right?!

I’m not sure about you, but I usually only use part of the bunch that I bring home from the store, and the rest gets slimy in the fridge while it waits to be used – and then I feel bad that I let it go to waste {ah, such a vicious cycle!}.

Inspired by this pin on Pinterest last year, I gave growing my own a shot – and it worked! I harvested the amount I needed {fresh! soooo yummy} all summer, and then towards the end of the summer planted them in our garden. To my surprise, they overwintered on their own, and have come back this summer as lovely as ever.

So, want to give it a try yourself? :) If you can cut a veggie and put water in a glass, you can do this! {it’s almost beyond easy}

how to re-grow green onions

All you need to succeed are a bunch of green onions {actually, you only need the bulbs (the white ends)}, an upright container, and water

how to re-grow green onionsstep one: wash your green onions

how to re-grow green onionsStep two: chop up the green section, cutting off the “leaves” all the way down to the crotch of the onions

how to re-grow green onionsStep three: place the onion bulbs in a glass {other other upright container – a small vase would also be lovely} and add just enough water to cover the roots

how to re-grow green onionsStep four: wait. But you won’t need to wait too long – the growth in this photo is only 5 days old! I recommend rinsing the roots every few days, and make sure that there’s always just a bit of water in the glass.how to re-grow green onions the roots will eventually start to wind around the base of your glass – lovely!

And that’s it! I’d love to know if you try and how you like it – and have any of you ever tried to grow {or re-grow} other things this way?

<3


p.s. I’m sharing this here: Skip To My Lou and on C.R.A.F.T.

How Tuesday: growing Easter grass

How Tuesday: growing Easter grass

Have you seen how some people  {Design Mom has a few sweet posts on it} have grown their own Easter grass? No? It’s a super sweet idea, and this year I decided to give it a try! It’s a simple but meaningful way to add a special touch to your Easter celebrations. It’s a great object lesson for children about new life and putting something “dead” into the ground and watching God make it come to life. Kind of a nice segue into talking about the Resurrection :)

note: If you do this NOW you’ll have some darling little pots of real grass for Easter. Or, you know, if you start the wheatgrass growing in the next few days …. :) {if you’re like me, it works better to tell yourself that it needs to be done NOW – that way it will actually get done, maybe not “now”, but at least soon}

growing wheatgrass via the Path Less Traveled

It turns out that growing wheatgrass is really easy. All you need is some wheat, some water and some dirt {and maybe a container to put the dirt in}. Yep, really easy.

Step one: soak your wheat berries/seeds for a few hours or over night. This isn’t truly needed, but does speed up the sprouting process.

growing wheatgrass via the Path Less Traveled

Step two: gather your containers and dirt. I chose to use some egg shells for some of the containers – when the grass is a little taller I’m going to make a centerpiece for our table like this one {you should click over – it’ soooo pretty! I wish it was my idea first :)}

growing wheatgrass via the Path Less Traveled

If you choose to use egg shells, simply tap your egg all the way around near one end instead of in the middle as you’re cracking it, and rinse out the shell after you’ve dumped out the white and yolk.

growing wheatgrass via the Path Less Traveled

Step three: fill your containers with soil. If you’re using a pot without a drain hole, place small rocks or packing peanuts in the bottom to provide some drainage and keep the seeds from rooting.

growing wheatgrass via the Path Less Traveled

Step four: place your wheat berries on top of the soil, covering the surface with an even layer, and then cover the wheat with more soil.

growing wheatgrass via the Path Less Traveled

Step five: water and wait. The seedlings should emerge in about 48 hours or so. Continue watering every day as it grows, and enjoy the bit of green!

growing wheatgrass via the Path Less Traveled

These are the eggs five days after planting – by the time Easter is here, they may need a trim! I’ll clean up the shells in a few days once the sprouts are a bit sturdier and use some wax to create the centerpiece I mentioned. Maybe I’ll post a photo when it’s done!

Let me know if you try it!


<3


How-Tuesday: Party Ceiling Pouf

How-Tuesday: Party Ceiling Pouf

There has to be a better name for it, but for now I’m calling it “Party Ceiling Pouf” {really, any of you have suggestions? Let me know!}

image via Lindsay Meinhart on Pinterest

I found this photo on Pinterest a while back, and when we started working on the pink princess party, I knew it would have to happen. Of course, when I was making it I just winged it and didn’t click through to see if there was a tutorial for it. :) After I was finished I found out that wasn’t a tutorial {yay for figuring things out on your own!} but one of the commenters suggested cutting the table covers in half the long way to double your “streamers” – even so, I think it turned out really sweet!

Easy Party Ceiling Decor Tutorial

I picked up all the materials {except for the tissue poms which I borrowed from the kids’ bedroom :)} at the Dollar Tree, and the entire project came to $5 – a huge impact for a small price!

materials for a party ceiling pouf via the Path Less Traveled

 materials: plastic table cloth, wire star garland and thumb tacks {all pictured} tissue poms or balloons and twine or fishing line {not pictured}

instructions for party ceiling pouf via the Path Less Traveled

step one: remove the table cloths from the packaging and gather half of one end in your hand.

step two: find where you want the “center” to be, climb up on a step stool and tack it up …

instructions for party ceiling pouf via the Path Less Traveled

… like this.

step three: Gather and tack up the other side of the end, then do the same with the opposite end.

Repeat with the other three table cloths, making a “+” shape on the ceiling.

DIY Party Ceiling PoufOnce you’ve used all four table cloths, you can stop there or continue on like I did and add a touch of whimsy and sparkle {which, it turns out, thrills little 4-year old girls!} by adding strands of the star garland along the underside of the draped cloths.

Easy Party Ceiling Decor Tutorial

step four: gather your tissue pons {or balloons} and, using twine or fishing line, hang them in a bunch in the center to provide a focal point and hide the bunching :)

step five: step back and admire your work :)

that’s it! Super simple with a huge impact – and a great way to make your celebration special.

xo

her pink princess party

her pink princess party

Ah, little girls. When they love something, the LOVE it, all the way. And our little princess Emma Grace LOVES pink and princesses and parties. {when asked who her favorite princess is she has no answer – they’re all her favorite!} She doesn’t really care if they’re Disney or otherwise, but if it’s a princess or pink, she is in LOVE. :) The only thing better is when it’s a pink princess – Sleeping Beauty? Score! Arielle, who wears a pink dress and has “orange hair like me!” is quite wonderful, too :)

And so, when we started talking about her birthday a few months ago, just about the first thing out of her mouth was “princess! pink princesses” {and none of us were surprised :)}

DSC_0050

– a tiny gold tiara for our 4 year-old princess –

I made up a Pinterest board with party ideas, and the ones she liked best were {can you guess?} PINK and had princesses in the photos. I’m not a huge fan of licensed characters, so we picked out lots of things that were more “princess-ey” than Disney-ish to try. Out of her favorites, we picked a bunch of ideas, and a few of them actually got done :)

DSC_0065

-a tiny gold crown adorning one of her baby photos and the crown I made for her to wear-

DSC_0055

– lots of pink! the ceiling pouf idea {tutorial here} came from {this} pin, the materials from Dollar Tree and the tissue poms from the kids’ room –

DSC_0062

– ribbon and bell wands {our Emma Grace loves these} with lots of soft colors, and enough pink to make her very, very happy –

DSC_0175

– the dessert table –

pink lemonade, punch, {these cookies} and {these rice crispy treats}, the princess poster is from Dollar Tree

We decided to celebrate her day with family and as we were scheduling, realized that the best thing for everyone would be to gather on the evening of her birthday, a Tuesday, for desserts and cake. I did my best to make things ahead and then set aside her birthday to love on her and get the party ready, but ah, the best laid plans :)

We did lots of loving on her {each time I would snuggle her and say “happy birthday! you’re 4 now!” she’d say, “awe, thanks mommy” with the sweetest little smile :)}, but by afternoon nap time I was running a bit behind! My sweet sister-in-law came over to help me pull the loose ends together {thank you again, Sarah!}, but one of the things I forgot was to charge the camera battery – hence some of the detail photos {like of the desserts, the piñata before it got smashed …} didn’t get taken. You’ll have to use your imaginations. :)

the Path Less Traveled: cute little Princess

All in all, it was a very sweet party to celebrate the sweetest four year old princess ever – and she was delighted. Which was the entire point of the party!

She had soooo much fun “helping” to set it up {we are still enjoying some of the decorations – I’m kind of loving the extra pink in our house :)} and I enjoyed making the things and “shopping the house” to find the decor {I actually only spent about $9 on the decorations – can you believe that?! the rest we already had around the house – score!}.

DSC_0047

– favor bag tutorial {here} –

I have a few how-to posts planned for some of the decorations, so stay tuned! And I’d love to hear how you and your families do birthdays – do you go all out on themes? or sweet and simple with just a cake {or birthday person’s choice of dessert}?

How-Tuesday: Pink Princess Party favor bag tutorial

How-Tuesday: Pink Princess Party favor bag tutorial

the Path Less Traveled: Pink Princess Favor Bag tutorial

Hello everyone! Yep, it’s time for How-Tuesday again – and this time I’ll show you a {sort-of} tutorial on how I made these darling favor bags for Emma Grace’s pink princess party {I’ve got a few more posts about her party planned – it was so sweet!}. Ready?

I had seen {these and these} sweet treat bags on Pinterest and knew that they’d be perfect for sending the favors home with Em’s guests. {the favors were these molasses crinkle cookies – Emma Grace frosted them herself :)}

the Path Less Traveled: Pink Princess Favor Bag tutorial

 to start with I used a pair of scallop scissors to even off and pretty up the ends of some brown sandwich bags.

the Path Less Traveled: Pink Princess Treat Bag Tutorial

then I used my multi-stamp that I use for all the hand-stamped things in the shop and some pink ink to stamp some 4-inch doilies with “thank you for coming!”

the Path Less Traveled: Pink Princess Treat Bag Tutorial

next, I used a glue stick on the edges of the doilies and sprinkled them with some bright pink glitter {so girly and princessey!}

DSC_0049

the last step was to pop the cookies into the bags, layer the doilies on them, fold over the tops and secure with a staple {I was hoping to punch holes and tie them with pink twine, but I was running behind … my sister-in-law ended up doing this step for me. Thanks so much Sarah!}.

DSC_0047

There you have it! Some sweet, simple, glittery and pink favor bags for a pink loving princesses birthday party :)

I’m really looking forward to showing you the rest of the details from her party! <3